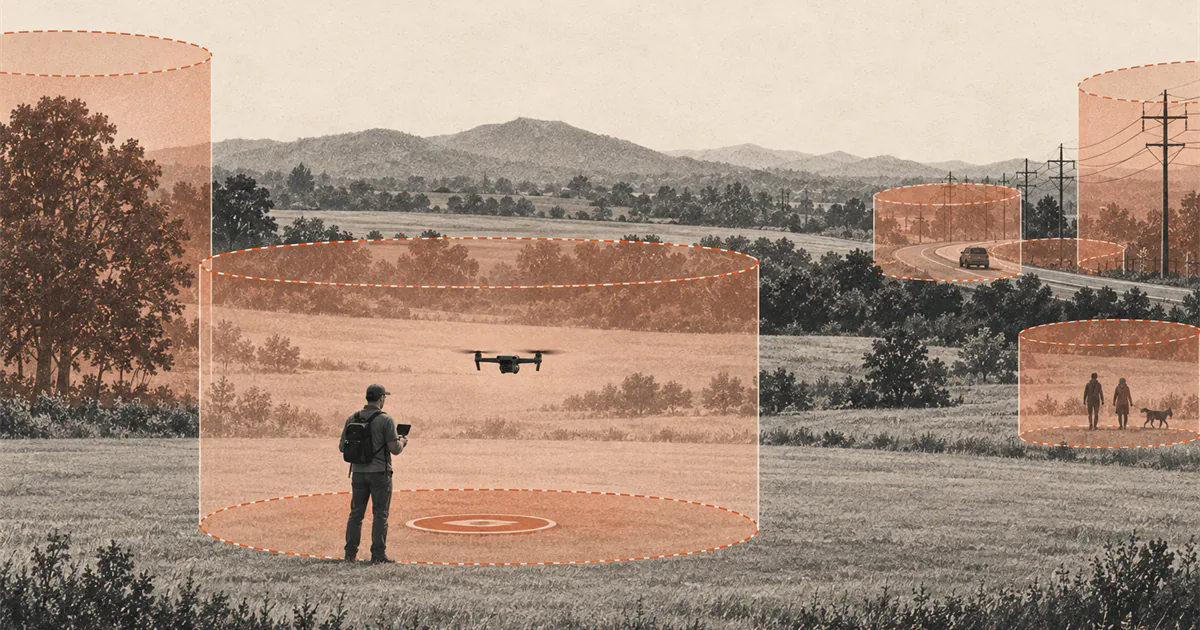
Direct answer
Choose airspace, ground access, and physical space separately.
Start with an FAA-recognized B4UFLY service, check current restrictions and any required authorization, then confirm that the owner or land manager permits takeoff and landing. Walk the area for people, traffic, wires, trees, loose debris, unstable surfaces, and changing weather. A useful first practice area gives you a clear launch point, a visible landing alternative, and enough open margin to stop and land without threading between obstacles.
Separate airspace from the ground below it
A place can look empty and still be the wrong place to launch. For a recreational flight in the United States, begin with the US location checklist and an FAA-recognized B4UFLY service. Check the exact pin, planned route, date, and time rather than judging the area from a wide map view.
B4UFLY provides situational awareness. It does not by itself issue every authorization or grant permission to use the property. If controlled airspace authorization is required, follow the current FAA path. The US recreational rules decision map keeps purpose, TRUST, registration, Remote ID, and authorization in the same preflight sequence. Recheck temporary flight restrictions close to the flight because a location that was clear during planning can change.
Then check the ground-access question. The FAA’s No Drone Zone guidance distinguishes airspace authority from restrictions on takeoff and landing imposed by state, local, tribal, territorial, or site authorities. A park, campus, beach, trail, event venue, or private field may have its own operating rules. Airspace authorization does not create permission to stand on or launch from that property.
Choose open margin, not a scenic route
The first practice area is a training space, not a filming location. Prefer a simple area where the aircraft can remain clearly visible and where a small control mistake does not immediately send it toward a tree, wire, building, road, person, or animal.
Look for:
- one clear place for the pilot to stand without moving into traffic or another hazard;
- a stable, level launch and landing surface free of loose material;
- open space around the entire short practice route, not only above the launch point;
- a visible alternate landing area if the original point becomes occupied or unsuitable;
- enough contrast to identify the aircraft’s nose and movement without relying on the camera view;
- a route that remains within visual line of sight and away from other aircraft activity.
There is no universal practice-area size. The needed margin depends on the aircraft, flight mode, wind, pilot skill, nearby hazards, and the maneuver. If the safe area exists only while every correction is perfect, it is too constrained for a first session.
Walk the area before unpacking
Map checks cannot show every wire, branch, temporary fence, sprinkler, animal, child, vehicle, or patch of loose gravel. Walk the intended operating area and look from the pilot’s actual position.
Pay special attention to thin obstacles that can disappear against the background. Wires, guy lines, bare branches, netting, antenna masts, and fence cables may be difficult to judge from a screen. Also check what lies beyond the practice boundary. A short drift should not lead directly toward traffic, water, a crowd, or inaccessible property.
Notice how other people use the space. A quiet field beside a path can become busy without warning. Decide in advance which entry into the operating area will end the drill and where the aircraft can land while separation is still comfortable.
Check surface and local weather
The takeoff point should support the aircraft as the manual requires. Avoid loose dust, sand, long grass, standing water, steep slopes, and material that propeller wash can lift. If the manufacturer specifies a landing pad, hand launch, or another procedure, follow that exact instruction rather than improvising.
Check sustained wind, gusts, visibility, temperature, and precipitation against the exact aircraft limits. The drone weather checklist provides the full forecast-to-site sequence. Then look for local effects across the whole practice area. Buildings, trees, ridges, and sheltered corners can make the launch point feel calmer than the hover area. Use the drone wind basics guide to assess those differences before committing to the site.
Sun angle and background matter too. If glare, haze, dark trees, or a uniform sky makes orientation hard to read, change the pilot position, shorten the route, or choose another time or place.
Build a simple practice layout
Use visible ground references without turning them into obstacles. A landing marker and a few lightweight markers outside the intended flight path can define the exercise. Keep people, bags, vehicles, and spare batteries away from the launch and landing area.
For a first session, plan only three zones:
- a pilot position with a clear view and stable footing;
- a launch and landing point with a clear propeller area;
- a small hover and movement area that remains well inside the hazard boundary.
Do not begin with a long route. The first useful exercise is a deliberate takeoff, a stable hover check, and a controlled landing. The takeoff and landing guide keeps that drill separate from the broader first-flight sequence.
Use a final site no-go check
Choose another location or postpone when:
- airspace status, authorization, TFRs, or site permission is unresolved;
- the area depends on flying over or close to people, traffic, animals, or property;
- wires, trees, structures, water, or inaccessible land leave no recovery margin;
- the launch surface conflicts with the aircraft instructions;
- wind or visibility differs materially across the planned route;
- the alternate landing area is not actually clear;
- the site becomes busier or less predictable after setup;
- you would need to watch the screen instead of maintaining the required visual awareness.
Once the location passes, run the full drone preflight checklist before powering the aircraft.
Sources
Check the underlying guidance.
These current FAA sources establish the airspace and ground-access boundaries. A B4UFLY status does not replace authorization, property permission, local rules, or an on-site hazard check.
- B4UFLY, Federal Aviation Administration. Government source. Checked . Used for the current FAA-approved service path and the airspace information B4UFLY provides.https://www.faa.gov/uas/getting_started/b4ufly
- Recreational Flyers & Community-Based Organizations, Federal Aviation Administration. Government source. Checked . Used for current US recreational scope, visual line of sight, airspace authorization, and right-of-way boundaries.https://www.faa.gov/uas/recreational_flyers
- No Drone Zone, Federal Aviation Administration. Government source. Checked . Used to distinguish airspace restrictions from state, local, tribal, territorial, and site-specific takeoff or landing restrictions.https://www.faa.gov/uas/resources/community_engagement/no_drone_zone
- Temporary Flight Restrictions, Federal Aviation Administration. Government source. Checked . Used for the current TFR check and the boundary that restrictions can change with time and location.https://www.faa.gov/uas/getting_started/temporary_flight_restrictions
Editorial disclosure: This guide combines current FAA location resources with a conservative editorial site-selection process. DroneReviewed is not claiming a site inspection or granting permission to fly at any location.