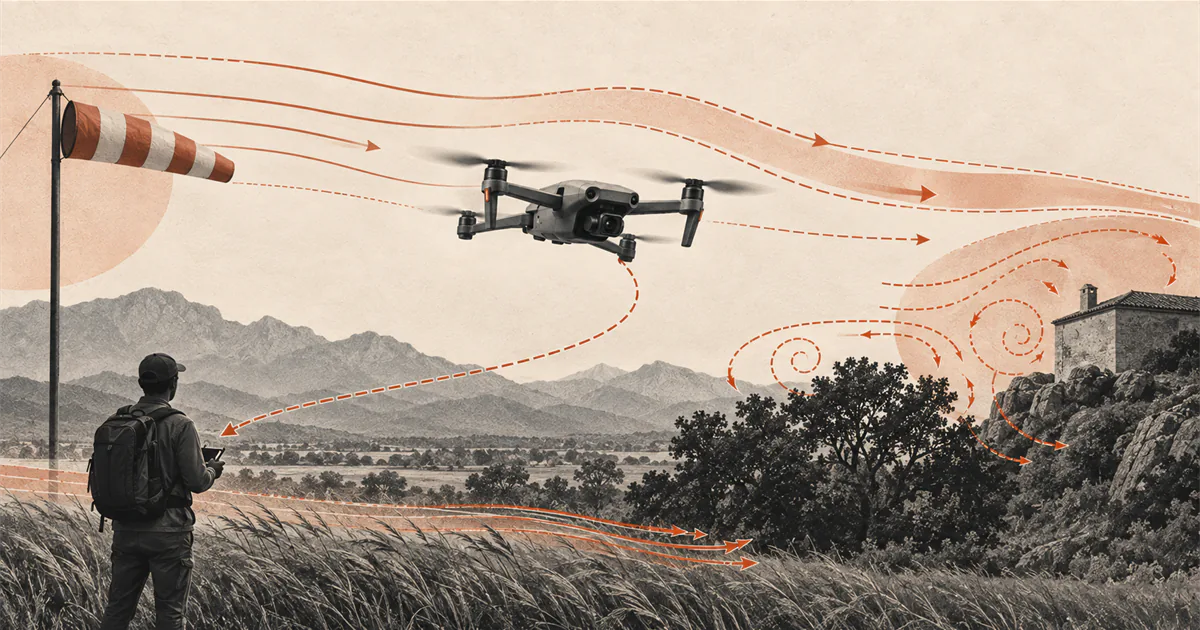
Direct answer
Treat wind as a model-specific limit and a changing local condition.
Check the exact aircraft manual, compare both sustained wind and gusts with its limits, and inspect the launch area for terrain or structures that can disturb the flow. Keep a return margin that does not depend on the forecast being exact. If the aircraft cannot hold a predictable position, warnings appear, or conditions are changing faster than expected, land using the model-specific procedure.
Start with the exact aircraft limit
There is no single wind number that makes every consumer drone safe to fly. Aircraft differ in propulsion, mass, control logic, operating modes, battery condition, and manufacturer restrictions. Begin with the current manual or official support page for the exact aircraft and configuration in front of you.
A manufacturer may publish a maximum wind-resistance figure. Treat that as a model-specific boundary, not a beginner target and not a promise that the aircraft will be easy to control at that speed. The DJI Mini 4 Pro FAQ, for example, publishes a figure for that model while also noting effects associated with its lightweight design. Another aircraft may use a different limit, test basis, or warning language.
Check whether the stated value refers to sustained wind, a test condition, a flight mode, or another defined circumstance. Also check operating temperature, precipitation restrictions, return-to-home behavior, and any app warnings that can change the safe decision.
Read sustained wind and gusts separately
A weather display can show a steady wind value and a higher gust value. Those numbers do not describe the same thing. The National Weather Service defines forecast sustained wind as an expected sustained wind at a specified height, while a forecast gust represents a short maximum within the forecast interval.
For a small aircraft, the higher gust value and the difference between the sustained value and gusts both matter. A calm average can hide short changes that demand faster correction or move the aircraft farther than expected. Do not compare only the lowest number on the screen with the aircraft limit.
Keep units consistent. Manufacturer documentation may use meters per second, while a weather source may use miles per hour or knots. Convert carefully and avoid rounding in a direction that makes conditions look easier.
Expect local wind to differ from the forecast
A forecast is a planning input, not a measurement at every point along the flight. The reporting or forecast height may be above the launch area, and nearby conditions can differ because of terrain, buildings, trees, temperature changes, or an approaching weather system.
FAA study material explains that ground obstructions can break up airflow and create gusts that change rapidly in speed and direction. The downwind side of a large building, tree line, ridge, bluff, or canyon can therefore be less predictable than a nearby open-area observation suggests.
Look at the whole operating area, not only the takeoff spot. A sheltered launch point may feel calm while the planned route crosses an exposed edge or rises into stronger flow. Do not use the sheltered reading as proof that conditions above or beyond it are the same. Include this comparison when you choose the practice area, not after takeoff.
Use observations as a cross-check
Before takeoff, compare the forecast with visible local cues and any suitable nearby official observation. Moving branches, blowing material, uneven water surfaces, rapid cloud development, or sudden shifts in wind direction can show that the launch area does not match the simple forecast summary.
These cues are not calibrated instruments. They help identify uncertainty and change, but they do not establish an exact safe wind speed. A handheld meter also measures only where and when it is used. It cannot prove that conditions near an obstacle or at flight height are identical.
Recheck immediately before launch as part of the drone weather checklist and the broader beginner drone preflight checklist. If conditions have changed since the plan was made, update the decision rather than treating the earlier forecast as permission to continue.
Preserve a conservative return margin
Wind affects more than the ability to hover. The aircraft may need more power to maintain position or make progress in a particular direction, which can reduce the margin available for the return and landing. A route that depends on a long fight back against the wind leaves little room for a shift, a stronger gust, or an unexpected delay.
Keep an early flight close enough that position, orientation, and aircraft response remain obvious. Note the wind direction before takeoff and avoid a plan that sends the aircraft far downwind before the return. Battery percentage alone is not a complete return plan because the required power and groundspeed can change with direction and conditions. If the objective is a steady hover drill, land when corrections grow instead of treating the wind as extra practice.
Battery condition also affects the margin you can trust. Between flights, follow the model-specific battery storage instructions rather than a universal charge target.
Return to Home is model-specific. Read how the aircraft sets altitude, responds to wind, handles low battery, and behaves when positioning or the control link is degraded. Do not assume automation can overcome conditions the aircraft cannot manage in normal flight.
Use clear wind stop rules
Decide your stop conditions before the motors start. Do not launch when any of these apply. If already airborne, land while a controlled landing remains available:
- sustained wind or gusts approach or exceed the model-specific limit;
- the forecast and local conditions disagree in a way you cannot explain;
- the aircraft cannot hold a predictable position with small corrections;
- drift increases or progressively larger corrections are needed as the aircraft climbs;
- the controller or aircraft reports a wind, propulsion, positioning, or battery warning;
- blowing dust, debris, precipitation, or reduced visibility creates another hazard;
- rain is approaching and the exact aircraft documentation does not permit the exposure described in the rain decision guide;
- nearby weather is developing or changing faster than expected;
- the return would depend on a groundspeed you cannot confidently maintain.
The FAA places responsibility on both remote pilots and recreational flyers to know the operation, aircraft limitations, local weather, and applicable rules. For a beginner session, postponing the flight is a complete decision. Practice is useful only when the conditions leave enough attention for learning rather than recovery.
Sources
Check the underlying guidance.
These records support the factual boundaries used in this guide. Model-specific manufacturer instructions still control for an individual aircraft.
- UAS Best Practices for Operations, Federal Aviation Administration. Government source. Checked . Used for the pilot responsibility to know aircraft limitations and local weather before flight.https://www.faa.gov/air_traffic/publications/atpubs/aim_html/chap11_section_8.html
- Remote Pilot - Small Unmanned Aircraft Systems Study Guide, Federal Aviation Administration. Government source. Checked . Used for the effects of ground obstructions, terrain, turbulence, and wind shear on aircraft performance.https://www.faa.gov/sites/faa.gov/files/uas/resources/policy_library/remote_pilot_study_guide.pdf
- National Digital Forecast Database Definitions, National Weather Service. Government source. Checked . Used to distinguish sustained wind forecasts from wind-gust forecasts and their observation heights.https://graphical.weather.gov/supplementalpages/definitions.php
- DJI Mini 4 Pro FAQ, DJI. Manufacturer source. Checked . Used only as an example of a model-specific manufacturer wind-resistance statement, not as a universal threshold or product recommendation.https://www.dji.com/mini-4-pro/faq
Editorial disclosure: This guide synthesizes current government weather and UAS guidance with a manufacturer-specific example. DroneReviewed is not claiming original flight or wind testing.